How to repair a broken joint
Multi section wheels are joined
by two of four pairs of pins and sockets. Older wheels used pin diameters of
about 16mm, and over time these pins have a tendancy to fracture.
Newer wheels have pins of 20mm diameter
with a bigger radius at the root of the pin and these are unlikely to fracture
unless maltreated.
The pins and sockets are welded to the rims
and great care must be taken to ensure absolute accuracy when the pins are replaced,
or the wheel will suffer from a permanent and incurable wobble.
Do not try to replace a joint yourself unless
you have a good workshop and the requisite skills. You will need welding, cutting
and grinding equipment and
the skills and experience to do an accurate job. You
may also need a lathe.
Stages in the replacement of a joint with
a new 'Standard Joint'
You can get new joints ready made from the normal Rhoenrad suppliers.
The following instructions are for a standard joint, but if
you are replacing a joint in an old wheel, try and get long joints as these
make the job much easier, then follow my instructions
for long joints
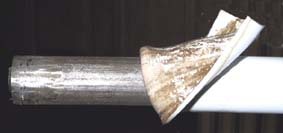 |
Peel
back about 25 Cm of the PVC either side of the broken joint |
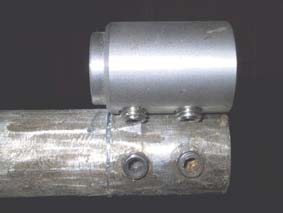 |
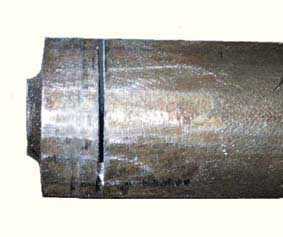
Measure and mark very carefully
the exact position of the joint. The picture shows the new socket laid on
the wheel so that the cutting point can be marked. The same must be done
with the pin end. You may find it easiest to assemble the wheel before marking
these positions. |
 |
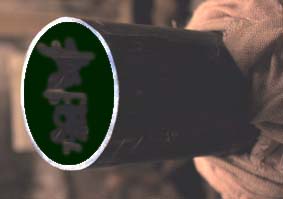
Cut out the old joint. This can be done
with a hack saw, but the steel is hard and it will take some time. The
old joint will be solid so you will be cutting into solid steel, not a
tube
If you leave the rim a bit too long you
can grind it off. If you cut it too short you will have problems. Take
care!
|
 |
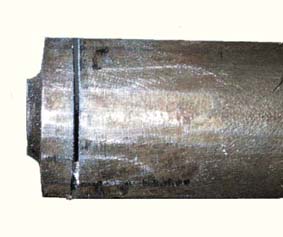
Grind the cut ends of the rim to ensure that they are
the right length and absolutely square. The problem now is to make the
new pin register centrally on the rim. I did this by marking the centre
of the end of the rim, pop marking it and drilling a 13mm hole in the
centre.
|
 |
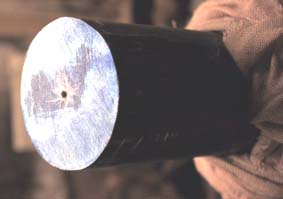
This is probably the most difficult bit of the operation,
but it is crucial to doing a good job. The end of the rim should be blued
and the position of the hole marked with several lines to ensure that
the hole is central.
Try not to let the swarf get inside the rim or it will
rattle as you roll!
|
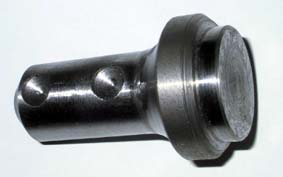 |
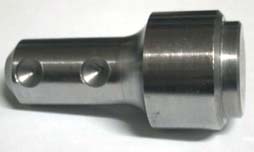
The new pin looks like this, it is designed to fit into
the end of a tube, but as the end of our tube is the solid end of the
old pin, it is necessary to turn down the pin base to fit our 13mm hole
|
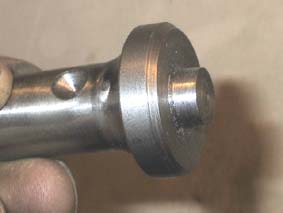 |
Here you can see the base of the new pin turned down to
13mm so that it will fit the hole drilled in the end of the rim
|
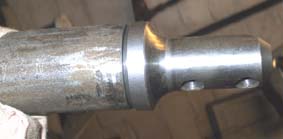 |
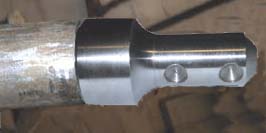
The pin can now be pushed onto the end of the rim. The
pin must be turned so that the dimples for the clamp bolts are lined up
with the inside of the rim. This pin can now be welded into place
|
The socket end of the rim must be similarly ground to length
and square to the rim. Again you cannot locate the new socked inside the tube,
so you must turn off the end of the new socket which was designed to go inside
the tube.
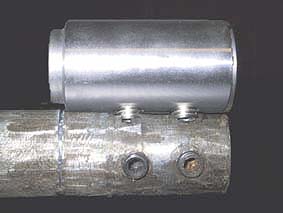
Now you should assemble the wheel with the new socket bolted
in place over the new pin, all being well the rim end of the new socket should
align pretty well with the end of the rim. Using clamps or whatever you have
to hand, centre the socket to the rim and clamp it tight while you weld the
joint.
Finally grind down any roughness or protruding weld before glueing
back the PVC covering
Use of Long Joints
The use of long joints will make your job much easier and quicker
as you can saw through the rim tube and not the solid steel of the old joint
If you have obtained some long joints then follow these instructions.
|
Peel
back about 25 Cm of the PVC either side of the broken joint. I then assemble
the wheel and make two pip marks with a punch, either side of the joint
and an exact distance apart. This helps accurate assembly later. |
 |
Measure and mark very carefully
the exact position of the joint. The picture shows the new long socket laid
on the wheel so that the cutting point can be marked. The same must be done
with the pin end. You may find it easiest to assemble the wheel before marking
these positions. |
 |
Cut out the old joint. This can be done
with a hack saw.
If you leave the rim a bit too long you
can grind it off. If you cut it too short you will have problems. Take
care!
|
 |
Grind the cut ends of the rim to ensure that they are
the right length and absolutely square.
|
 |
The new 'long joint' pin looks like this and will fit
into the end of a tube. As the tube is likely to be slightly flattened,
you may have to do some careful work with hammers and a file to ensure
a good fit.
|
 |
The pin can now be pushed onto the end of the rim. The
pin must be turned so that the dimples for the clamp bolts are lined up
with the inside of the rim. This pin can now be welded into place
|
The socket end of the rim must be similarly ground to length
and square to the rim. you can locate the new socked inside the tube, again
you may need to hammer the tube and file the socket to get a good fit into a
slightly flattened tube
Now you should assemble the wheel with the new socket bolted
in place over the new pin and align the wheel sections using the pip marks punched
earlier and weld both the pin and socket ends to the rim.
Finally grind down any roughness or protruding weld before glueing
back the PVC covering
Please email
me with any comments or suggestions and I will include them on this site