 How to make your own DeJong Bindings
How to make your own DeJong Bindings
For many years Peter DeJong has been making bindings which are now used by wheelers all over the world. I recently took this series of photographs showing details of how they are made. Peter, helped by Johanna have made many hundreds of bindings and they hope that these instructions will enable you to make your own.
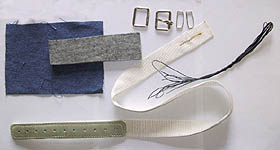
The following materials are required for each binding
Nylon webbing 96 cm long x 3 cm wide x 1.7 mm thick (for children's bindings 90cm. long)
Strong Thread. 2 pieces, 1m long each. (The thread used to stitch saddles is ideal).
Thin thread
A piece of leather for buckle pin holes 23,5 mm x 28 mm
Denim 15 cm x 20.5 cm
felt for padding 18 cm x 5 cm x 1 cm thick
Strong Buckle
metal ring
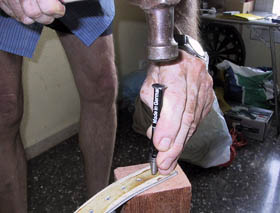
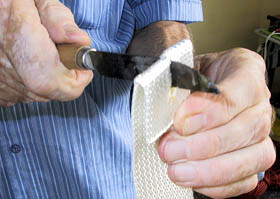
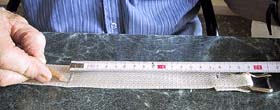
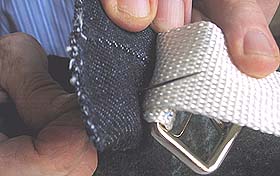
2 loops for the free end of the strapFirst punch 11 holes 2 cm apart along the center of the leather strip. The holes should be 4mm in diameter, big enough to easily take the pin of the buckle. This leather should now be glued to one end of the nylon webbing with a contact adhesive and the glue allowed to dry before stitching it to the webbing. You may find it best to get a local shoe repairer or saddlemaker to stitch this for you. Fold back 4 cm of the webbing (the end which does not have the leather fixed to it) and using a hot knife, melt a slot about 15 mm long to take the buckle. The fold should be in such a direction that if the webbing is held with the leather on top, then the fold should be downwards so that the free end is folded against the webbing on the opposite side to the leather. Now fit the buckle to the end of the webbing and using the thin thread, fix it with a temporary stitch, twice round. Ensure that you have the buckle the right way round, as shown in the picture.
Before using the buckle, ensure that the join is properly welded, it must be discarded if the weld is suspect.
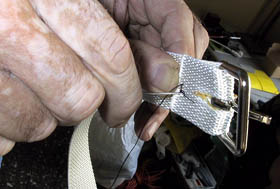
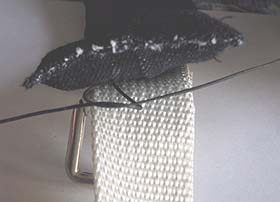
Before starting to stitch, make a knot in the end of the thread. This picture shows the professional and easy way to make a large knot. A length of thread has one end through the eye of your needle, take the other end and wrap it 4 times round the end of the needle, then pull the needle and the rest of the thread through these 4 turns and you will end up with a knot in the end of the thread. Now measure 19 cm from the buckle end of the webbing and mark it with a soft pencil or biro . Then mark 2 lines, each 19 cm long, on the webbing, 20 mm apart and on the same side as the leather, these are guide lines for the stitches. Slide the 2 loops over the end of the webbing, followed by the metal ring. The ring can be another buckle with the pin removed. Before using the ring, ensure that the join is properly welded, it must be discarded if the weld is suspect.
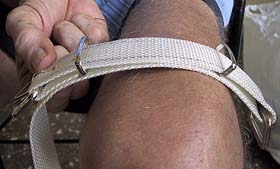
Now fold the webbing round the ring at the 19 cm mark and make another temporary stitch to hold it in place. You should then put a 3rd temporary stitch in at the buckle end going through the 3 layers of webbing, but before doing so bend the strap over your knee so that it takes up the curve that you will need in the final item.
Before the next stage you must make the pads, see the bottom of this page.
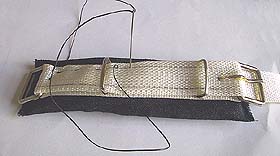
The pad should be fixed on the same side of the webbing as the leather. Start at the ring end, hold the pad (seam side) against the webbing and pull a length of the strong thread halfway through. The first stitch should be a double stitch (twice round) then continue to stitch through the webbing and the pad following the guide lines and making stitches about 8 mm long. Make sure of 2 things.
1. that you hold the binding in a curve while you stitch it
2. that you stitch the rings into the correct position. (1 ring against the end of the webbing at the buckle end, and the other 6 cm from the ring end).Pull the thread very tight after each stitch.
When you reach the buckle end of the binding, do another double stitch and finish between the webbing and the pad.
Using the other end of the thread, stitch down the same edge of the binding and again finish by coming out between the webbing and the pad.
To finish this side of the stitching pull both ends of the thread tight and tie the ends together with a reef knot between the webbing and the pad, to make a hidden knot.
Finally stitch the other edge of the binding in an identical manner.
Get into a wheel and try it out!
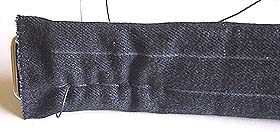
Making the pad.
With a sewing machine zig-zag stitch round all sides of the denim then stitch the denim into a tube 20.5 cm long, stitching 15 mm from the edge of the material. Turn the tube inside out and ease a piece of felt inside it so that the join lies along the canter of the felt. Finally stitch up the ends of the tube (a zig-zag stitch is best for this). On the side of the pad without the seam, mark 2 lines 20 mm apart as a guide for the stitching.
For children, you can make a slightly narrower pad with felt 18 cm x 3,5 cm x 1 cm., some adults also prefer this. Also instead of denim you can use thin suede leather if you prefer.
If you succeed in making your bindings please drop me an email or leave a note in the visitors book (home page). Also if you have difficulty in understanding any of the above, again drop me an email and I will try to clarify it.